Showing posts with label Macaroons. Show all posts

January 15, 2017

Road to Macaroons: Making the Macarons!!

Time to get down to business!! I found a YouTube Video that had sort of the recipe on it, I followed the videos instead but I added coffee to my ganache (again, two kids 1 year and 2.75 years old). 

So I sifted the flour again, weighed it at 125g. Then I sifted the powdered (confectioner) sugar. Then I combined them, by sifting them again. I added the coco powder and instant coffee at this point.


I started on the egg whites. Let me say, I thought I over whisked them in BOTH batches because I got a hollow bit at the top, turns out my oven was a smidge too high when baking. After 2 days of "maturing" the air space went away and they were PERFECT!! So if you didn't know you're supposed to age your Macrons for 24 hours at least in the fridge. That way the filing and the cookie doe their "thing" and become perfect. Anyways back to egg whites. I used my KitchenAid mixer but you can use a hand mixer. It took about 5-7min from start to finish (the second time my eggs were cold and still only took 7min). I put in cream of tartar for the help, heck I want them to look good so why not?!


Mix until stiff peaks form. THIS is stiff peaks below. STOP as soon as they do this.


My recipe says to add it in all at once, both of them did say this, well second time round I added them in thirds. Geesh, that was A LOT easier actually. 


Let me say something here. This is the piping step. USE A BIG HOLED TIP aka a STAR TIP. Do it. I didn't and it was a mess the first time. The second time, omg you'll see below how much better they were the second time round. Now it says wait 30 minutes for a skin to form. No idea why but mine formed within piping time (about 10 minutes both times). This didn't allow me to get the air bubbles out creating some uneven raising but meh they worked. So in the oven they went. Feet, oh glorious almost impossible to get feet... I got them with EVERY one both times!! 


 Out of the oven after 15 minutes!! First batch, look at that piping job... Yup I cringe too.


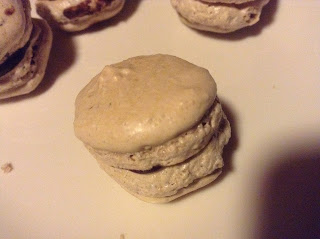
Here is my ganache (which was enough for two batches of macarons. This is the star tip I used to pipe the second batch of macarons.


Filing and pairing. They are delicious!!


NOW the second batch. Look at THAT piping!! Yay, so much better, and I didn't use templates for either batch. Seriously these were for me and my husband, not to sell!


Want to make your own? DO it, but get the almond flour from the store. It was a bit too much, however quality was kept the whole time and they are so delicious!

January 13, 2017

Road to Macaroons: Drying the almonds and Almond Flour

After sprouting it is CRITICAL to dry your almonds. Please, DRY THEM all the way!! Let me tell you a little story... So I didn't dry mine all the way. I put my oven on Warm and dried them for about an hour. So I put my almonds in my food processor, they became an oily MESS!! So I made Batch 1 of the marzipan potatoes but they were chunky and uck... 

So the next day, I dried them a bit more. Then into the food processor more went with powdered sugar because everyone says to do it so you don't get almond butter. Yup... I made marzipan again but I over whipped it and it was soon much smoother. Lesson: don't be shy it takes A LOT to make almond butter, it really does.

So back in the oven the almonds went on WARM. So I figured this was enough time so in the BLENDER (I don't have a lot of water at my disposal so I had to switch machines) they went. I put in a little bit of granulated sugar to add a bit of grit. Guess what? Still too oily. Angry by this point, the kids and husband going crazy, I lost my timidness. So up went the heat to 200F and I left the now sugary almond chunks in there for 2 hours. Well, that worked!!! Dry as a bone! They needed 200F in MY oven to actually dry out. See, you're on a time clock once you sprout almonds, they go bad really quickly. 


So back to my now clean blender and voila, almond flour!! You can see me sifting it through a metal strainer (required) and a silicone spatula (also required).


I had a bit left over that was bigger chunks, they actually get added into my (SPOILER ALERT) second batch of macarons.

January 11, 2017

Road to Macaroons: Blanching and Sprouting Almonds

So I wanted to learn to make the mysterious French Macaroon (Macron). My husband, Dear Farmer, and I are coffee fanatics (we do have 2 kids under the age of three). So I looked up a recipe for Coffee macarons with a chocolate ganache filling. 

So I looked up the recipe, wrote down the ingredients to get at my local grocery store. Believe it or not, I live close to 1.5 hours away from the nearest large grocery chain. I got EVERYTHING on the list... except almond flour. If you don't know, macarons MAIN ingredient is almond flour.

Crud. So I bought almonds instead. FOUR, 6oz cans at $3.25 each (if you want to know the brand I bought look for green lids). I was making eggless Marzipan Potatoes as well, thank you Knitmore Girls for the idea. Guess what the main ingredient of marzipan potatoes are by chance?? Yup, almond flour.

So, making Almond Flour became my first step. So I looked it up on WikiHow, so scientific right? It says to blanch the almonds AND to sprout them. Oh... goodie. So step one, blanch the almonds by boiling water and putting 2 cans in the water for 1 minute (more like 5 if you don't want to go crazy). Two cans is more manageable (its what is pictured below so you can see how many are in 2 cans). Two cans will yield just over 1 1/3 cups of almonds. 

You can see my setup below: 1. Pot for the boiling, 2. Strainer for the straining of the water off, but keep a little water in the pot, it helps keep the almonds warm, 3. Bowl for the skins, 4. Measuring cup or something else glass or metal to hold the almonds (it keeps the fat from soaking into the vessel), 5. An absorbent surface because it drips water, mine is a cotton prefold diaper (its clean of course). After you have strained the almonds then work quickly by popping the almonds out of their skins, if you waited 5 minutes in the hot water then they should all come out easily. A layer of water forms under the skin and so it pops off nicely, thus the absorbent layer. If they are giving you trouble put them back in the strainer, the stem from the water you saved in the pot will help open the skins without adding more water.


So Blanching.... DONE. Now to the sprouting. Basically you add double the water to the amount of almonds you have, cover, and let them sit for 8-12 HOURS (again WikiHow showed me how to do this step). You rinse out the water every 3-4 hours. You do not have to sprout your almonds, most commercial almond flours don't and some don't even use blanched almonds. Macrons are a delicacy, at least remove the skins if you make your own almond flour. Sprouting not only gains your yield (they double in size over the sprouting period), but it takes away the harmful digestive inhibiting enzymes that almonds produce when eaten. If you eat whole almonds your body will naturally stop when enough is reached, with almond flour or anything baked with almond flour somehow this signal is ignored so people tend to overeat causing harm. Well, I plan on devouring my macarons without guilt (they are about 200 calories each so I need not have to worry about a tummy ache too).

Here is my sprouting process, yes that's a flour sack towel diaper I got from the hospital when my Calamity was born (again, clean of course). After four hours the water was cloudy and after 8 hours they were almost ready, I let them go 12 hours. They had started to open, which means the sprouting process was complete.